Digispark, Neopixels, 3D Printing and LEGO
July 26, 2017A while ago, somewhere on the internet, I came across the Digispark hardware. It's a coin-sized USB development board, based on an ATtiny85 processor and can be programmed using the Arduino IDE.
I (have to admit that I) immediately picked up a couple of cheap Chinese clones (5 pieces for about 10$) and I must say that I am really impressed by their potential.
Arduino IDE
At first, uploading sketches to the Digispark can be a bit cumbersome and tedious, but you get used to it and here is what worked best for me (on Ubuntu 16.04):
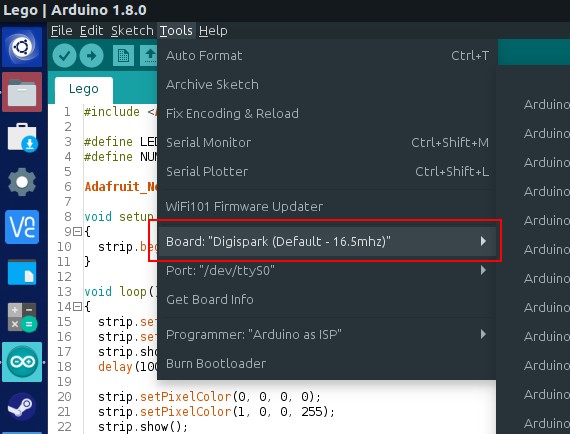
Get the correct board programmer for the Arduino IDE. I had to add this URL http://digistump.com/package_digistump_index.json to the IDE's Board Manager preferences. Then you can download the Digispark board progammers. They show up like this in my environment:
Do not use USB hubs or USB extension cables when trying to upload a sketch. Communication between the board and the IDE was most stable when I plugged the board directly to my PC.
The order of the next steps is critical:
- Unplug your Digispark .
- Hit Upload in the Arduino IDE.
Wait for a message like this to appear in the console:
Sketch uses 2334 bytes (38%) of program storage space. Maximum is 6012 bytes. Global variables use 39 bytes of dynamic memory. An error occurred while uploading the sketch Running Digispark Uploader... Plug in device now... (will timeout in 60 seconds)- Now, plug the Digispark in and the upload should start.
> Please plug in the device ... > Press CTRL+C to terminate the program. > Device is found! connecting: 16% complete connecting: 22% complete connecting: 28% complete connecting: 33% complete > Device has firmware version 1.6 > Available space for user applications: 6012 bytes > Suggested sleep time between sending pages: 8ms > Whole page count: 94 page size: 64 > Erase function sleep duration: 752ms parsing: 50% complete > Erasing the memory ... erasing: 55% complete erasing: 60% complete erasing: 65% complete > Starting to upload ... writing: 70% complete writing: 75% complete writing: 80% complete > Starting the user app ... running: 100% complete >> Micronucleus done. Thank you!- (If it doesn't work: rinse, repeat)
Once you get the hang of this, it's hardly different from working with Arduinos as you're probably used to.
Neopixels
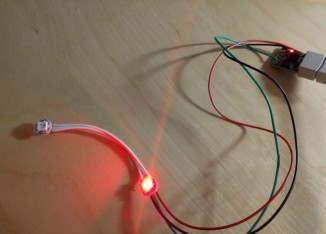
Since working with blinky LEDs is always fun, I gave Adafruit's Arduino Neopixel library a try and it worked without any problems.
Here's a the sketch I used to make 2 Neopixels (WS2812 LEDs) blink alternately red and blue.
#include <Adafruit_NeoPixel.h>

#define LEDS_PIN    4
#define NUM_LEDS    2

Adafruit_NeoPixel strip = Adafruit_NeoPixel(NUM_LEDS, LEDS_PIN, NEO_GRB + NEO_KHZ800);

void setup()
{
  strip.begin();
}

void loop()
{
  // red
  strip.setPixelColor(0, 255, 0, 0);
  strip.setPixelColor(1, 0, 0, 0);
  strip.show();
  delay(1000);
  // blue
  strip.setPixelColor(0, 0, 0, 0);
  strip.setPixelColor(1, 0, 0, 255);
  strip.show();
  delay(1000);
}
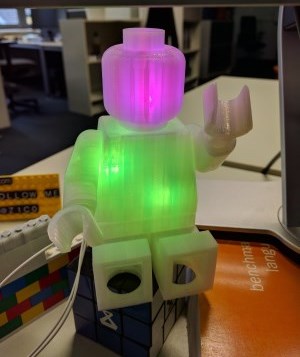
Illuminated LEGO
Thinking where I could take it from there, I remembered a 3D printed XL LEGO figure I had sitting in a drawer. The original plan was to illuminate this figure using Neopixels and an Arduino Nano, but the Digispark seemed to be an even better fit.
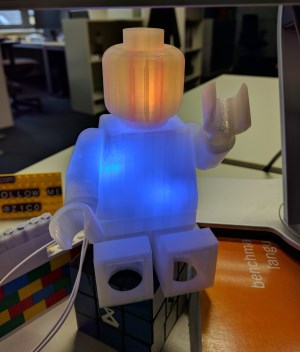
So I put 1 LED inside the figure's head and 2 in its body, switching their colors randomly.
The code can be found here: https://github.com/z1c0/LedStrip/tree/master/Lego.