New Year, New Blog
January 18, 2017TL;DR:
- This blog is now running on ASP.NET Core MVC.
- I migrated my existing blog posts from Orchard CMS.
- New blog posts are written using Markdown and static page generation now.
It's done!
I finally found time to migrate my blog and website from Orchard CMS to an ASP.NET Core MVC project.
This is something I had been intending to do for a very long time now, but I postponed it ever since due to the sheer amount of effort this meant. But I was able to free up some time over the Christmas holidays and made a promise to myself that "my first blog post in 2017 would appear on my new website".
Well, here it is: The very first blog post on my new site! And those were all the necessary steps it took me to get there.
Step 0 - The Problem(s)
Orchard CMS
A couple of years ago I had made the decision to run my blog and website on Orchard CMS. I had chosen it because it was a blog engine running on ASP.NET MVC, therefore allowing me to add custom routes for my projects, articles, CV, etc. It seemed like a good idea at that time and I really liked Orchard's power and extensibility.
One thing I had underestimated at that time though, was how huge Orchard actually was. At the end of the day, Orchard is a full blown CMS which usually means that it is a big overkill for running a personal website and blog.
It just wasn't a very good fit from the beginning but it took me too long to actually realize that. My problems and concerns with Orchard just became more and more obvious over time.
- It felt slow: Probably due to the reason that I was dealing with full-blown CMS this shouldn't have surprised me that much.
- Complexity: Any time I had to do customizations, it felt like a huge waste of my time. I am not an Orchard professional and every time I came back after a couple of weeks or months to tweak or customize things, I had to relearn Orchard's complex infrastructure.
- Updating to new versions was a big pain each time. I had custom modules and customizations which usually stopped working or disappeared after an upgrade.
Windows / Open LiveWriter
When I started blogging 10 years ago, Windows Live Writer was probably your best authoring tool option to use. For mysterious reasons though, Microsoft stopped developing this great tool in 2012 but it was still OK to use afterwards. Only, it started to feel dated after some time.
Then in 2015, this tool got open sourced as Open Live Writer which caused some initial enthusiasm. But looking at its GitHub repo now, this seemed to be the classical "open source a product to its grave" scenario. There have hardly been any commits during the last year and its feature set is still not at par with LiveWriter (plugins!).
In addition, its HTML WYSIWYG approach feels dated and clumsy by now and really falls apart on high DPI displays. Another thing that has always bothered me about it was its poor support of code snippets.
So basically, from the moment on I had first written documents using the Markdown syntax on GitHub, I had always wanted to use this same approach for my blog posts.
Long story short: I figured, I really needed to escape this Orchard / LiveWriter ecosystem I had locked myself into, if I wanted to keep my happiness and sanity as a blogger.
Step 1 - Choosing a new Platform
Considering available options for running my new website and blog on, those were the criteria I came up with on which I wanted to base this decision:
- Lightweight and easy to maintain: This was the most important aspect and actual reason I was looking for a new solution. Making changes or adding features to the website needed to be as easy as possible.
- Markdown: Being able to write my blog posts using Markdown was also a must-have.
- Linux: Since I decided that 2017 would be my personal "Year of the Linux Desktop" this was as well crucial. I needed to be able to write my blog posts, as well as code and debug this site using Linux.
- ASP.NET Core: This would be my preferred technology option since I have been a .NET guy from the very beginning. Also, ASP.NET MVC is by far the best web framework IMHO. That said, I would have been OK with another technology (e.g. Node.js) as well, had it fulfilled the other requirements to a better extent.
Those were the actual solutions I considered:
- Ghost: This one nearly made the race, since it is light and fast, cross-platform (running on Node.js) and it uses Markdown. It was probably my bias towards .NET (and the possibility to reuse some of my existing code) that ruled it out in the end.
- Wyam: I read about this one just recently and really liked its static site generation approach and the fact that it is based on .NET Core. Unfortunately, running it on Linux is not possible (at the moment) which also made it a "no".
- downr: This is another very recent project I came across. It is really small and lightweight and running on ASP.NET Core MVC. It uses Markdown for blog posts and transforms them to HTML using the Markdig NuGet package. I also managed to run it on Linux, which made it the nearly perfect fit ...
Nonetheless, in the end I decided not to go with downr and roll my own solution because:
- In its core, downr is really not a lot of code. It's your regular ASP.NET MVC project template leveraging Markdig for HTML generation. The actual work I had to put in would be in my custom MVC Controllers, Routes, Views, JavaScript and CSS. So no big gain in using it.
- I would have needed a fork of downr anyway, since it is not modular enough to just take e.g. its blogging part and integrate it into an existing site. So, getting updates and merging them into my fork could have caused me all kinds of problems that I really wanted to avoid in the first place.
- Somehow the static Markdown to HTML generation idea appealed to me and I wanted to have this as part of my solution.
The die had been cast: I was rolling my on solution.
Step 2 - Escaping Orchard CMS
Of course I did not want to lose my existing 230+ blog posts stored in Orchard and needed some way of exporting those.
Since Orchard is a CMS and most of its artifacts are kept inside a database, writing some code was required to export the content of my blog posts and their meta data.
As a first step, I just added a new route Export to the existing MVC
HomeController class so I could trigger the export process by navigating to
http://<ORCHARD_HOST>/export.
public class HomeController : Controller
{
  private readonly BlogExporter _blogExporter;

  public HomeController(IBlogService blogService, IBlogPostService blogPostService, ITagService tagService)
  {
    _blogExporter = new BlogExporter(blogService, blogPostService, tagService);
  }

  public ActionResult Export()
  {
    _blogExporter.Export();
    return Content("OK");
  }

  ...
}
The interfaces IBlogService, IBlogPostService and ITagService are part of Orchard
and its dependency injection mechanism takes care of providing them to the constructor of
the newly created BlogExporter class.
public class BlogExporter
{
  private readonly IBlogService _blogService;
  private readonly IBlogPostService _blogPostService;
  private readonly ITagService _tagService;

  public BlogExporter(IBlogService blogService, IBlogPostService blogPostService, ITagService tagService)
  {
    _blogService = blogService;
    _blogPostService = blogPostService;
    _tagService = tagService;
  }
  ...
}
Here's what the actual Export method looks like:
internal void Export()
{
  var blogPart = _blogService.Get(VersionOptions.Published).FirstOrDefault();
  if (blogPart != null)
  {
    var baseDir = "<PATH_TO_DIRECTORY>";
    var blogPosts = _blogPostService.Get(blogPart);
    var posts = new List<Post>();
    foreach (var b in blogPosts)
    {
      var slug = GetUrl(b).Split('/').Last();
      posts.Add(new Post
      {
        Slug = slug,
        Title = b.Title,
        Published = b.As<CommonPart>().CreatedUtc.Value,
        Tags = GetCategoriesForPost(b).ToArray()
      });
      File.WriteAllText(Path.Combine(baseDir, slug + ".html"), b.Text);
    }
    var formatter = new JsonSerializerSettings();
    formatter.ContractResolver = new CamelCasePropertyNamesContractResolver();
    var json = JsonConvert.SerializeObject(posts, Formatting.Indented, formatter);
    File.WriteAllText(Path.Combine(baseDir, "blogposts.json"), json);
  }
}
Export basically iterates over all existing blog posts and uses
Json.NET to persist the individual Post
instances. That's the metadata I was interested in:
internal class Post
{
  public string Slug { get; set; }
  public string Title { get; set; }
  public DateTime Published { get; set; }
  public string[] Tags { get; set; }
}
The actual HTML content of the blog post gets stored in an .html file.
The only thing missing now are following helper methods that deal with building URLs and returning the categories / tags for a blog post.
private static string GetUrl(IContent blogPostPart)
{
  var autoRouteItem = blogPostPart.ContentItem.Parts.FirstOrDefault(p => p is AutoroutePart) as AutoroutePart;
  if (autoRouteItem != null)
  {
    return autoRouteItem.Path;
  }
  return string.Empty;
}

private IEnumerable<string> GetCategoriesForPost(BlogPostPart post)
{
  foreach (var tag in _tagService.GetTags())
  {
    foreach (var i in _tagService.GetTaggedContentItems(tag.Id))
    {
      var blogPost = i.As<BlogPostPart>();
      if (blogPost == post)
      {
        yield return tag.TagName;
      }
    }
  }
}
So now I had all I needed for migrating my blog posts to the new solution:
- All metadata of my blog posts in a simple-to-parse JSON file.
- The actual content in .html files.
- Images and other content, I could just download from Orchard's Media folder.
Note: I deliberately decided not to export comments, since I (sadly but honestly) did not get much involvement there.
Step 3 - The New Site
These are the basic building blocks I used for putting the new site together:
- The ASP.NET Core MVC Yeoman template.
- The Clean Blog Bootstrap theme.
- Prism for syntax highlighting.
- wolf for Markdown to HTML static content generation.
Yeoman / ASP.NET MVC
Yeoman is a Node.js based tool that can generate project scaffolds based on different templates. One of those templates happens to be for ASP.NET.
I generated the project following these instructions but basically it comes to a simple command line instruction.
yo aspnet
In the following wizard I created a Web Application Basic which was up and
running using following commands.
dotnet restore
dotnet build
dotnet run
Clean Blog / Prism
To change the default look and feel of the ASP.NET MVC application I imported the CSS and JavaScript files from the Clean Blog Bootstrap theme to the wwwroot directory.
Additionally, I added the Prism CSS and JavaScript files which enable really beautiful syntax highlighting for a huge variety of languages.
wolf
This is a small and simple Markdown to HTML static content conversion tool that I wrote.
It tries to follow the Unix Tools Philosophy of "doing just one thing and doing it well". Therefore, all it does is reading Markdown files and spitting out HTML files. Not more, not less. No integrated web server, no project template, just static content generation.
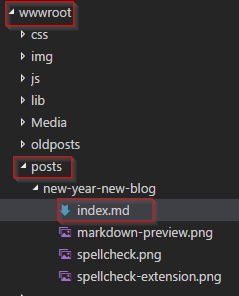
I run the wolf executable inside the wwwroot folder of my web application. By default, wolf looks for a folder called posts that contains the subfolders with the individual blog posts. Such a subfolder's name also acts as the slug (URL route) of the blog post and the first .md in the folder will be converted to HTML.
Of course, your mileage may vary here and you are probably using different folder names in your project. Check out the README.MD file for wolf to see how those default settings can be changed.
So this is how the posts folder looks before running the wolf conversion.
This is after the wolf conversion.

As we can see, we now have an additional .html file per blog post as well as a posts.json file containing the metadata for all blog posts.
[
  {
    "slug": "new-year-new-blog",
    "title": "New Year, New Blog",
    "published": "2017-01-18T18:00:00",
    "tags": [
      "Blogging",
      "ASP.NET",
      "DotNetCore",
      "Linux",
      "Orchard",
      "Markdown"
    ]
  }
  ...
]
This JSON file can easily be parsed in the web application to build the list of available blog posts.
public class JsonRepositoryLoader<T>
{
  private string _fileName;

  public JsonRepositoryLoader(string fileName)
  {
    _fileName = fileName;
  }

  public List<T> Load()
  {
    var items = JsonConvert.DeserializeObject<List<T>>(File.ReadAllText(_fileName));
    items.Sort();
    return items;
  }
}
The type argument for the JsonRepositoryLoader is the Post class, which
looks like this:
public class Post
{
  public string Slug { get; set; };
  public string Title { get; set; };
  public DateTime Published { get; set; }
  public string[] Tags { get; set; };
  ...
}
Its only non-trivial property is Content which retrieves the actual HTML content
of the blog post through Lazy evaluation.
public Post()
{
  Content = new Lazy<string>(() =>
  {
    var html = string.Empty;
    var fileName = Path.Combine(WebRootPath, "posts", Slug);
    fileName = Path.Combine(fileName, Slug + ".html");
    if (File.Exists(fileName))
    {
      html = File.ReadAllText(fileName);
    }
    return html;
  });
}
That way, we can later render this content as it is in our Razor view Posts.cshtml.
<main>
  @Html.Raw(@Model.Content)
</main>
You might have noticed that we chose the same data format (JSON and .html) files for our previously exported blog posts (the Orchard CMS ones). This means we can easily load them using the exact same mechanism we are using for the newly created (Markdown) ones.
Blogging with Markdown
This is my very first blog post written entirely in Markdown and I have to say it is pure joy!
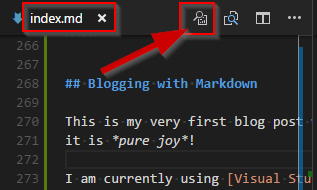
I am currently using Visual Studio Code as my markdown editor. It gives nice syntax highlighting for the actual Markdown code and additionally has a built in Preview functionality.
There are also a couple of Markdown extensions available on the Visual Studio Code Marketplace.
Personally, I find the Code Spellchecker extension really helpful.
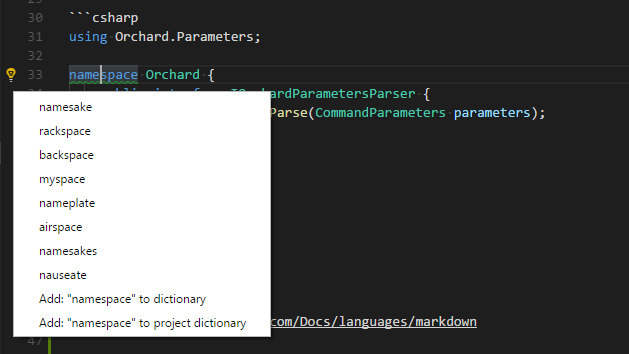
This extension allows for quick corrections or adding new words to the dictionary through the light bulb smart tag metaphor.
Open Issues
So everything is up and running now and went really smooth so far. Apart from a couple of tweaks und improvements that I still need to do, there are two bigger issues I haven't really made my mind up about yet.
- Search: Currently my blog does not allow searching for content. I could of course integrate Google or Bing site search but I really dislike their integration (or rather their lack of). Every time I encountered those on other sites, it felt clumsy and was sticking out like a sore thumb. So I will probably go and integrate a "real" indexing and search engine (that I have yet to chose) to this site.
- Comments: As I mentioned before, I did not migrate those few comments I got on by old blog since I did not see much engagement there. I do get the feeling though that I should have some kinds of feedback or comments mechanism. So I will most likely go and integrate the Disqus service here.
That's a Wrap!
This was quite a lengthy and exhaustive blog post but it was an important step for me and I felt that I should document my motives and steps adequately. If you read this far maybe let me know what you think (as soon as I have comments in place) or contact me on Threads @z1c000.